
Intro - What You Need -
Resolution, etc. - Frame Rate -
Don't Forget the Audio - Kill the Bumpers! -
Got Leaders? - Encoding
Intro
This guide assumes you're already familiar with most of the material in AbsoluteDestiny and ErMaC's Guide to All Things Audio and Video.
It is meant mainly as a supplement thereto, as the guides currently don't contain information on convention submissions and making proper encodes for them.
If you haven't read it already (or at least the parts on how to export your footage and serve it with AVISynth), do so, and then come back here.
Please note that this guide assumes NTSC throughout, as I've never worked with PAL footage before, and NTSC anime DVDs tend to be easier to work with than PAL ones anyway.
One of the best and most popular formats for submitting AMVs to conventions is MPEG-2. It retains very high quality (at high bitrates) while still providing decent compression, and almost all major contests accept it.
MPEG-1 isn't as good as MPEG-2 in the compression department, but it's still decent for convention submission purposes and widely accepted; plus, unlike MPEG-2, you don't have to pay to get a fully working MPEG-1 encoder.
This page will show you how to make a working MPEG-2 (or -1) encode of your video using the popular and effective MPEG encoder TMPGEnc 2.5.
It will NOT show you how to improve the visual quality and/or compressibility of your footage; I'm only concerned with explaining what's absolutely necessary. Besides, when it comes to convention submissions, no one will care how big your file is anyway.
Also, get Tsunami MPEG Encoder (aka TMPGEnc); it's free and comes with MPEG-2 encoding capabilities for a limited demo period.
Pegasys also offers a 14-day free trial of TMPGEnc Plus 2.5.
Lastly, download the Otaku Video general submission TMPGEnc profile I've uploaded, and save it to your TMPGEnc Templates directory.
This is probably the most common scenario: you had a 4:3 source (most anime series and OAVs) or a letterboxed movie, and you edited it and exported at the DVD resolution of 720x480. Great! You don't need to resize at all. Leave your script as it is for now. ^_^
So you had a 4:3 source or a letterboxed movie, and you resized it to the square pixel resolution 640x480 before editing. That's fine for online distribution; however, for convention purposes you'll want to resize it back to 720x480.
Add this line to your script:
LanczosResize(720,480)
Since the height is still 480, we don't need to worry about interlacing issues.
The situation: You had a letterboxed movie, you cropped off the letterboxing and edited it at 720x352. To get back to 720x480, we have to re-letterbox it:
AddBorders(0,64,0,64)
(This is the best case for cropped letterboxed sources; if the height of the borders is a multiple of 8 (like 64), things are made much easier for the encoder.)
The situation: You had a letterboxed movie, you cropped off the letterboxing, but you ended up with a height of something other than 352.
In this case you're going to want to add borders, like with the previous case -- but they won't be 64 pixels tall. In order to get the height of the borders, take 480, subtract the height of your video, and divide by 2.
For example, if you cropped to 720x360, your borders would be: (480 - 360) / 2 = 120/2 = 60 pixels tall, so you'd add the following line:
AddBorders(0,60,0,60)
The situation: You had a letterboxed movie; you cropped off the letterboxing AND resized horizontally (NOT vertically!) to a square pixel aspect ratio of 640x352 or whatever.
This is just like the 720x??? cropped letterbox cases above, except at the end you have to resize horizontally to get the width back up to 720.
So, for example, if your export was 640x352 (best case), you'd add the following lines to your script:
AddBorders(0,64,0,64)
LanczosResize(720,480)
This is where things start getting tricky. I hope you've removed any interlacing from your video, because this will involve vertical resizing. If you haven't, go read this page on interlace removal after editing, add the necessary lines to your script, then come back here.
The situation: your source was encoded on the DVD for anamorphic playback (e.g. Chobits, Haibane Renmei, .hack//*, many movies), and you didn't resize it, so your exported AMV is at 720x480. In this kind of situation, things usually look stretched and characters look skinny (I mean, more so than usual).
Add the following lines to your script:
LanczosResize(720,352)
AddBorders(0,64,0,64)
Now some of you may be thinking, "Why can't we keep it at 720x480 and just set the 16:9 aspect ratio flag when we encode this sucker?" The answer is that the hardware used by many cons will NOT display such a file correctly; it will ignore the 16:9 flag, with the end result that all your footage will look vertically stretched, and that's not good. It's much safer to resize and letterbox, because then you know it will come out right on the big screen.
Once again, I hope you've removed any interlacing; if not, go here and add the necessary lines to your script, then come back.
The situation: your source was encoded on the DVD for anamorphic playback, and you resized it horizontally (NOT vertically!) to something like 848x480 or 960x480 and exported at that resolution.
As before, add the following lines to your script:
LanczosResize(720,352)
AddBorders(0,64,0,64)
If you didn't see your particular situation on the above list:
If your source is 4:3 or letterboxed, resize it to 720x480 with the line:
LanczosResize(720,480)
If your source is 16:9, resize it to 720x352 and letterbox:
LanczosResize(720,352)
AddBorders(0,64,0,64)
And please do remember to remove interlacing FIRST if you plan to change the height.
Thankfully, this section will be much shorter than the last, because there are only a few possibilities here. :)
Basically, you'll have one of these three situations (once again, we are assuming you live in NTSC Land):
Well, didn't you luck out! This may be a pain to compress for internet distribution, but it's the best frame rate you could have for convention purposes. You don't need to change a thing -- leave your script as it is. ^_^
In this case, the next question to consider is:
Will you be encoding to MPEG-1 or MPEG-2?
If you are encoding to MPEG-2, then you're fine -- just pay attention later in the encoding section when I mention the 3:2 pulldown flag.
If you are encoding to MPEG-1, then you'd probably better telecine it up to 29.97. Thankfully, the AMVapp contains a helper script by AbsoluteDestiny written for just this purpose.
Add the following line to your script:
ADTelecine(order=1)
If for some reason this function fails, then add this instead:
AssumeFrameBased()
SeparateFields()
SelectEvery(8, 0,1, 2,3,2, 5,4, 7,6,7)
Weave()
First add the following line:
AssumeFPS(23.976,true)
Then go back up to the 23.976 fps case and follow the instructions there.
At this point you should check to make sure your audio is included in your script and resample it to 48kHz (so TMPGEnc doesn't have to).
If the video file you exported and are currently serving with your AVISource() line includes the audio, then you're fine -- UNLESS you edited progressive in Adobe Premiere and sped the audio up to match the 24fps video and now you want to reattach the original audio.
If this latter case is true, then add the following line to your script:
AudioDub(last,WAVSource("C:\mypath\myoriginalaudio.wav"))
(again, use the real path and filename)
If the video file does NOT include the audio, then you'd better attach it now. Add this line:
AudioDub(last,WAVSource("C:\mypath\myaudio.wav"))
Now, regardless of what you just did (even if you didn't add anything new to your script), add the following to resample your audio:
SSRC(48000)
If your video file doesn't contain any credits, title cards, or other bumpers, then ignore this section.
But if it does have any of the above, then please pay attention. Most convention contests feature uniform title cards for the videos shown, and the coordinators generally do not want to have to deal with chopping off bumpers that you made yourself.
Open up your script in VirtualDubMod.
If your video has bumpers at the beginning AND the end:
Scroll through until you find the first frame after the beginning bumper ends, then take note of what frame number you're on (it should appear in the bar at the bottom of the window). Also locate the first frame before the ending bumper begins and note its number as well.
Then add the following line to your script:
Trim(startframe,endframe)
(where startframe and endframe are the two numbers you took note of)
If your video only has bumpers at the beginning:
Scroll through until you find the first frame after the bumper ends, then take note of what frame number you're on (it should appear in the bar at the bottom of the window).
Then add the following line to your script:
Trim(framenumber,0)
If your video only has bumpers at the end:
Scroll through until you find the first frame before the bumper begins, then take note of what frame number you're on (it should appear in the bar at the bottom of the window).
Then add the following line to your script:
Trim(0,framenumber)
Many conventions require a specified length of silent black leader before and after every video submission -- this is usually for such reason as giving the hardware time to synch up the video and audio streams so that the first second of your video doesn't get screwed up, or making sure part of your video won't get chopped off when it gets recorded to the contest tape, or whatever. Here's how to add such leaders, if necessary.
The first thing you have to do is store the video you've already got in a variable:
video=last
Next, we have to define a blank leader and store it in a variable. There are some parameters to go over here (my names only), so pay attention:
leader=BlankClip(framecount,720,480,"colorspace",mfps,1000,48000,true,true,000000)
Now attach the leaders to the video:
leader++video++leader
At this point your script is ready: it should be serving up 720x480 video at either 23.976 (MPEG-2 ONLY) or 29.97 frames per second, plus the matching audio at 48000 Hz, with no bumpers and as much blank leader as the contest requires. (If you're in doubt about any of this, test the script in VirtualDub(/Mod) and see if it works and if all the properties are correct.)
All that's left is to actually encode the sucker.
As I mentioned before, you've got two options here: MPEG-1 or MPEG-2. MPEG-2 is preferred, but some people can't encode MPEG-2 files (viz. those whose MPEG-2 trial periods for TMPGEnc have expired and who don't want to buy the program). However, there's only one thing that really needs changing for an MPEG-1 encode; otherwise the process is the same for both.
Got that Otaku Video general submission TMPGEnc profile I mentioned earlier? Good.
Pop open TMPGEnc; if the Project Wizard doesn't pop up automatically, select it from the File Menu. You should then see a screen like this:
You'll see I have selected the Otaku Video general submission profile. Do the same, then hit Next. (If it doesn't show up on the list, then you didn't save it to the Templates directory.)
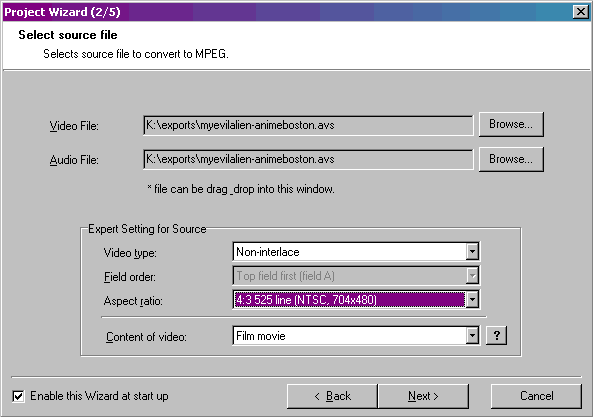
You should then come to this screen. Click the Browse... button next to the Video File box; in the dialog box that comes up, change the file type to All Files, then select your AVISynth script. Once you do, the same file name should automatically pop up in the Audio File box (if it doesn't, then you forgot to attach your audio). Also, TMPGEnc will automatically detect the settings on the bottom half of the window.
Video type should be non-interlace if your video is progressive, interlace if your video is interlaced. Easy enough.
Field order will be greyed out if the video is non-interlaced; if your video is interlaced, this should match the field order (which will usually be top field first).
Aspect ratio should be some variation of 4:3 525 Line (if it's not, then you didn't resize properly).
Content of video should be "Film movie" -- if it's not, change it.
Done? Hit Next.
The next screen concerns filter settings, which we don't care about and which should all be unchecked -- however, click the "Other settings" button, and you'll be greeted with this screen:
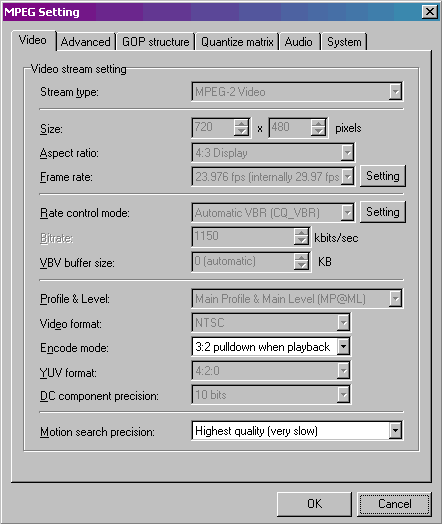
Most of these settings you shouldn't have to worry about -- Otaku Video set up the profile so that they hardly need to be changed. However:
If your video is at 23.976fps, you should check to make sure that "Frame rate" is set to "23.976 fps (internally 29.97 fps)" and that "Encode mode" is set to "3:2 pulldown when playback". This is important. The 3:2 pulldown flag is what makes your 23.976fps progressive video play back as 29.97 interlaced, telecining on the fly, which is what both you and the contest coordinator want.
If your video is at 29.97fps, "Frame rate" should be "29.97 fps", and "Encode mode" should be "Interlace". At 480 lines and 29.97fps, conventions generally prefer interlaced submissions to progressive ones, as "it is much easier to change the interlace field order than to undo a bad 'Interlace to Progressive' encoding."
If you're encoding to MPEG-1 instead of MPEG-2, right-click on the words "Stream type" and select "Unlock" from the menu that drops down. It will give you a warning about being out of standard -- click Yes. Then click the drop-down stream type menu and select MPEG-1 Video.
If you're going the MPEG-1 route, your video should already be at 29.97 fps (if it's not, then you forgot to ADTelecine it in AVISynth).
Also, change "Motion search precision" to "High quality (slow)" -- the difference in quality should be negligible compared to the encode time saved.
Don't bother with the other tabs -- all the settings induced by the profile are fine.
Edit, 7/21/10: Go to the "Quantize Matrix" tab, and UNCHECK the box for
"Output YUV data as Basic YCbCr not CCIR601". This will ensure that your video never gets too bright or
too dark for proper playback over the projector at the convention.
Hit OK to return to step 3 of the wizard, then hit Next.
Then hit Next again -- step 4 concerns the bitrate of the file, but that's automatically set by the profile you selected and is perfectly fine for convention purposes.
Which brings you to step 5 of the wizard. Enter the filename you want to save to, check "Start encoding immediately", hit OK, and let 'er run!
However, you'll want to watch the preview screen (if it's not showing anything, then under the Option menu, select Preview option --> Display with thinning). Check to see that the video looks the way you want it to. If by some chance...
... then you'll want to go back to your script and add the line:
ConvertToRGB24()
Sometimes TMPGEnc won't process a script properly if it's not returning video that's in the RGB24 colorspace; this line ensures that your script is.
That's all! When your encode finishes, you should have a nice, big, beautiful MPEG-2 (or -1) file, suitable for sending off to the convention of your choice.
I hope this guide has been helpful. Happy submitting and good luck! ^_^